
Beyond the Baseboard: Your Ultimate Guide to Buying Skirtings Online
Skirting boards, often called baseboards, are a fundamental design element that many people overlook. However, they serve a crucial role in protecting your walls, concealing unsightly gaps, and adding a polished, finished look to any room. In the past, sourcing the perfect skirting board meant visiting multiple hardware stores, often with limited selection and stock. Today, the process has been transformed by the ability to purchase skirtings online, offering a world of choice, convenience, and customization right at your fingertips. This guide will walk you through everything you need to know to make an informed decision when upgrading your home’s interior trim.
Navigating the online marketplace for home improvement materials can seem daunting at first. With countless profiles, materials, and finishes available, it is easy to feel overwhelmed. Nevertheless, buying online provides unparalleled access to a wider variety of styles than any physical store could possibly stock. This guide simplifies the process. We will explore the different materials available, delve into the vast array of styles and profiles, explain how to measure your space accurately, and provide installation tips. By the end, you will have the confidence and knowledge to select and order the perfect skirting boards to elevate your home’s aesthetic.
Understanding Your Material Options
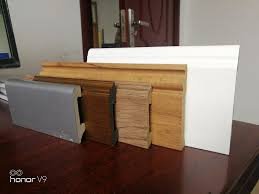
The material you choose for your skirting boards significantly impacts their durability, appearance, and cost. When you shop online, you will find detailed descriptions of each material, which helps you compare their benefits and drawbacks. The most common options are MDF (Medium-Density Fibreboard), softwood, and hardwood. Each one brings unique qualities to the table, catering to different needs and budgets. Understanding these differences is the first step toward making a purchase you will be happy with for years to come.
MDF is an engineered wood product made by breaking down hardwood or softwood residuals into wood fibres, combining them with wax and a resin binder, and forming panels by applying high temperature and pressure. This process results in a very smooth, consistent surface without knots or grain patterns, making it an ideal candidate for painting. MDF is often more affordable than solid wood and is less prone to warping or cracking with changes in temperature and humidity. Furthermore, many online suppliers offer moisture-resistant MDF, which is perfect for use in bathrooms, kitchens, and other areas prone to dampness. Its stability and flawless finish make it the most popular choice for modern homes.
On the other hand, solid wood options like softwood and hardwood offer a more traditional and natural aesthetic. Softwood, typically derived from pine, is a cost-effective wood choice that features a visible grain and knots, adding rustic character to a room. It is lightweight and easy to work with but can be more susceptible to dents and scratches than MDF or hardwood. Hardwood, such as oak or ash, sits at the premium end of the spectrum. It is exceptionally durable, resistant to wear and tear, and boasts a beautiful, rich grain that can be stained or varnished to enhance its natural beauty. While more expensive, hardwood skirting provides a timeless elegance and longevity that is hard to match, making it a worthwhile investment for high-end properties.
Choosing the Perfect Profile and Style
Once you have settled on a material, the next exciting step is selecting a profile. The profile refers to the shape and decorative cut of the skirting board. This detail, though subtle, has a massive influence on the overall style of your room. Online retailers typically categorize profiles by design era or aesthetic, such as traditional, contemporary, or minimalist. From the ornate curves of Victorian and Georgian designs to the clean, straight lines of modern profiles like Square or Chamfered, the options are virtually endless. Browsing online catalogues allows you to visualize how different shapes will complement your existing décor.
For a classic or period-style home, profiles like Ogee, Torus, or Lambs Tongue are excellent choices. These designs feature intricate curves and detailing that add a touch of sophistication and grandeur. They pair beautifully with traditional architectural features like high ceilings, ceiling roses, and sash windows. Conversely, for a contemporary or minimalist interior, simpler profiles are more suitable. A Square-Edge profile offers a clean, sharp finish that is understated and modern. Other popular choices for modern homes include Bullnose, which has a simple rounded top, and Pencil Round, which offers a slightly softer look. The key is to choose a profile that harmonizes with your home’s character rather than competes with it.
Getting Your Measurements Right
Accurate measurements are the cornerstone of a successful skirting board installation. Ordering the wrong amount can lead to frustrating delays and extra costs, so it is vital to get it right the first time. Before you place your order online, you need to measure the perimeter of each room where you will be installing the new boards. Use a reliable tape measure to determine the length of each wall, and be sure to write down the measurements as you go. Add all the wall lengths together to get the total linear meterage required for the room.
After calculating the total perimeter, it is industry standard to add an extra 10-15% to your final figure. This additional length accounts for wastage from cuts, particularly the angled cuts needed for corners (known as mitre cuts), and provides a buffer for any potential mistakes. Most online suppliers sell skirting in standard lengths, such as 2.4 meters or 3 meters, so you will need to calculate how many lengths you need to cover your total required meterage. Double-check your calculations before adding the items to your cart. It is always better to have a little extra left over than to be a few inches short of finishing the job. Also, consider the height of the skirting board, as this will dramatically impact the room’s proportions.
Preparing for Installation
Once your new skirting boards arrive, proper preparation is essential for a smooth installation and a professional-looking finish. First, if you are replacing old skirting, you will need to remove it carefully. Use a utility knife to score the caulk line along the top of the old board to prevent a tear in the drywall paper. Then, use a pry bar and a small block of wood (to protect the wall) to gently lever the old boards away from the wall. Work your way along the length of the board, prying it off in small sections.
With the old skirting removed, take the time to prepare the walls. Scrape off any residual adhesive or old caulk and fill any holes or gouges with a suitable filler. Once the filler is dry, sand it smooth to create a flat, clean surface for the new boards to sit against. If your new skirting boards are unprimed, now is the best time to apply a coat of primer. Priming and even applying a first coat of paint before installation is much easier than trying to paint them neatly once they are fixed to the wall. This preparation work ensures your new skirting will fit snugly and look seamless.
Fixing and Finishing Your New Skirting
The final stage is fixing your new skirting boards to the wall. The most common method is to use a combination of grab adhesive and nails or screws. Apply a zigzag bead of high-strength grab adhesive to the back of the board, press it firmly against the wall, and then use a nail gun or hammer and nails to secure it in place. If you are using nails, drive them in at a slight downward angle for a stronger hold. For masonry walls, you will need to drill holes and use wall plugs and screws. When joining two lengths of skirting along a straight wall, use a scarf joint (a 45-degree angled cut on both ends) for a less visible seam.
With all the boards securely in place, the finishing touches will bring the project to life. Fill all nail holes and joints with wood filler and sand them smooth once dry. Then, apply a thin bead of decorator’s caulk along the top edge where the skirting meets the wall and in the internal corners. This conceals any small gaps and creates a sharp, clean line. Once the caulk is dry, you can proceed with your final coats of paint. Painting the skirting boards after they are installed ensures that all joints, nail holes, and caulk lines are covered, resulting in a flawless, integrated finish that enhances the entire room.